Surya Namaskar or Sun Salutation is the king of Yoga poses. Thus, how to do Surya Namaskar the traditional way is key to its benefits. The ancient yogis taught that the different parts of the body are governed by different devas or divine impulses of light the best yoga exercise or pose to energise these impulses.
The masters of the ancient forms of yoga Kundalini Yoga and Hatha both propounded that the Surya Namaskar is the complete body workout.
Doing 12 sets of the Sun Salutation steps in a span of 15 minutes translates into doing 288 powerful yoga asanas.
Surya Namaskar or Sun Salutation Steps – Complete Yoga Poses explained
Before we start learning the steps of Surya Namaskar will quickly go through the 7 Benefits of Sun Salutation.
Benefits of Sun Salutation
1. Yoga and the attitude of gratitude
Besides good health, Surya Namaskar also provides an opportunity to express gratitude to the sun for sustaining life on this planet.
2. Surya Namaskar and Mental Stimulation
Also, there is a Surya Namaskar solar plexus connect. The main reason why the ancient Rishis (sages) recommended the practice Sun Salutation because the regular practice of this technique enhances the solar plexus. It also increases one’s creativity and intuitive abilities.
Yoga History Origin and Types of Yoga

II. Medical benefits of Surya Namaskar
The regular practice of Surya Namaskar improves blood circulation, maintains health and prevents you from the disease. The yoga routine has numerous health benefits for the liver, heart, stomach, intestine, chest, throat, legs and almost every other part of the body.
III. Surya Namaskar is good for the ‘heart’
It is for this reason that Sun Salutation is officially crowned as the king of yoga asanas.
An article in the International Journal of Pharmacological Research refers to experiments by the Department of Neurobiology Care Sciences and Society, Karolinska Institutet, Huddinge, Sweden; states that due to the active process of inhalation and exhalation during the pose, the lungs are ventilated and the oxygen levels in the blood increase.
Thus the exercise is a great way of detoxing by getting rid of excess carbon dioxide.
IV. Surya Namaskar has a Calming Effect
The Journal of Bodywork and Movement Therapies sites an experiment on healthy Asian Indian men and women 18–22 years who had trained in Surya Namaskar for over two years states that various poses help to improve memory and the nervous system.
The report also states that the exercise routine also stabilizes the activity of the endocrine and thyroid glands, thereby reducing anxiety and inducing calmness.
V. Sub Salutation helps in Digestion and Stomach Function
A 2010 study published in the Journal of Physical Education & Sport concluded that sun salutation or Surya Namaskar is an excellent way to improve the muscular endurance of the muscles of the stomach.
The forward bend posture helps in increasing the abdominal space thereby releasing the gases trapped in the body.
Regular stretching and compressing of stomach region tones up the digestive tract getting you rid of constipation.
How to choose the yoga style right for me
VI. Surya Namaskar brings down Blood Sugar Levels
For those suffering from diabetes, this is a Godsend pose. The different stages of vigorous bends and stretches increase the supply of blood in the body, thus bringing down blood sugar levels.
VII. Surya Namaskar strengthens muscles and joints
Surya Namaskar requires intense stretching of joints and muscles in the body. This means loosening and toning of muscles.
The different postures ensure symmetry of the limbs while improving the flexibility of the body.
A 2010 study published in the Journal of Physical Education & Sport concludes that Surya Namaskar improves muscular endurance and flexibility.
How to Perform the Surya Namaskar Yoga Asana or Pose
The best time to practice the Sun Salutation is early in the morning when the sun is rising. The best way is to perform it facing the sun. While doing so, make sure your stomach and bowels are empty.
Always start your Surya Namaskar practise by sitting comfortably on the mat cross-legged or in a Lotus Pose and do 5-10 minutes of Breathing Exercise pr Pranyama to calm your mind, body and spirit. Watch Video on how to practise Pranayama.
Also, it is important to perform the exercise regimen as slow as possible for best results.
How to do Surya Namaskar: 12 Steps and Poses (Asanas) with Images
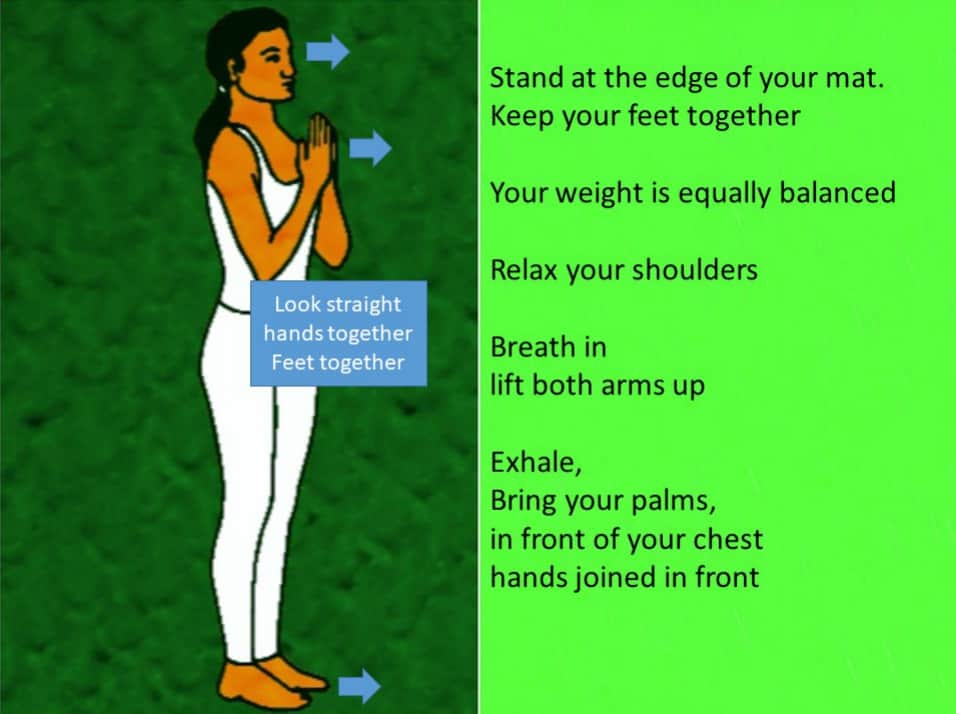
Surya Namaskar Step 1: Payer Pose – Pranamasana
- Stand at the edge of your mat
- Keep your feet together
- Your weight should be equally balanced
- Relax your shoulders
- Breathe in and lift both arms up
- Exhale, and bring your palms in front of your chest with thumbs touching your heart as you join your palms.
- Breathing is at the base for the first step of the Surya Namaskar yoga practice. If you get the rhythm correct in the beginning you will keep up that rhythm during the entire set of this the king of yoga poses.
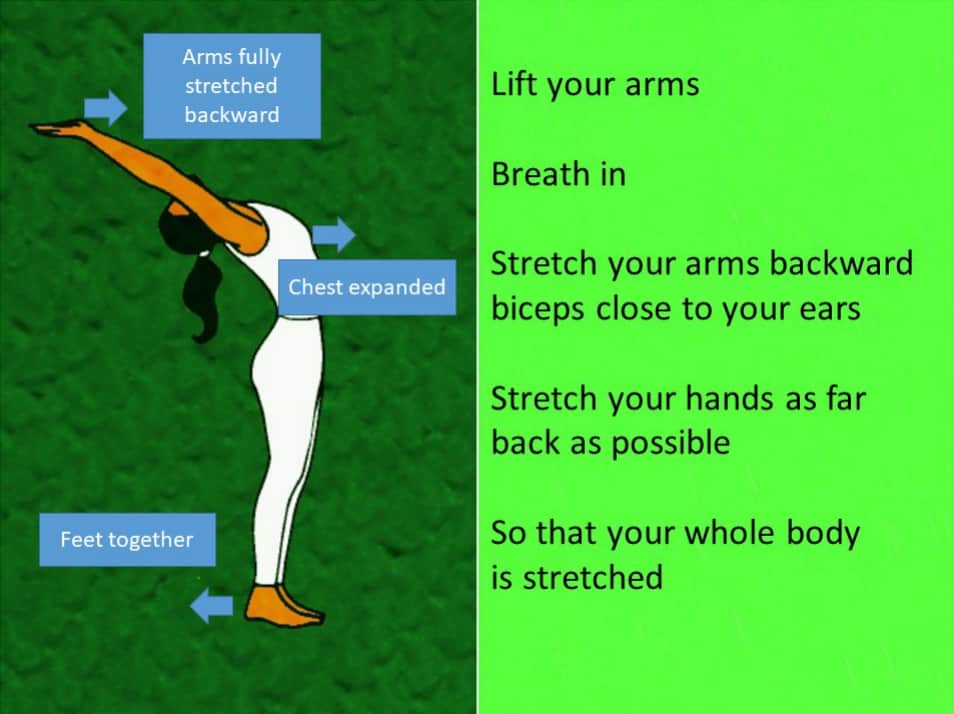
Surya Namaskar Step 2: Raised Arms Pose – Hastauttanasana
- The second step of Surya Namaskar is to lift your arms as you inhale.
- Stretch your arms backwards while keeping your biceps close to your ears
- Stretch your hands and back as far behind as possible – so that your entire body stretched.
- To achieve better results push the pelvis forward a little bit. This will make the arch a little deeper and also help in the breathing for this step.
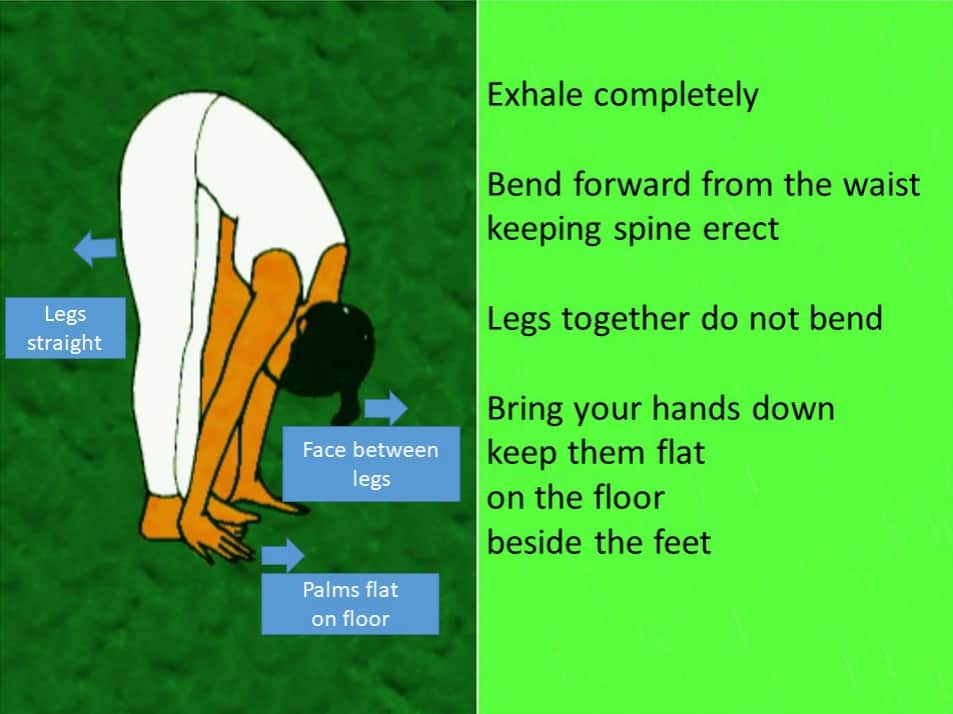
Surya Namaskar Step 3: Standing Forward Bend –Pada-Hastasana
- As you bend forward exhale completely in the third step of Surya Namaskar also called the standing forward bend Pose.
- Make sure you bend forward from the waist while keeping your spine straight. Do not bend your spine when you bend forward.
- As your feet are next to each other – when you bend the legs or knees should be straight.
- As you bend down with arms outstretched – rest the palms of your hands (or tips of your fingers) on the floor next to your toes.
- If it is a little tough at first to keep your legs straight while placing your palms flat on the ground you may bend your knees a bit to achieve this posture of Surya Namaskar.
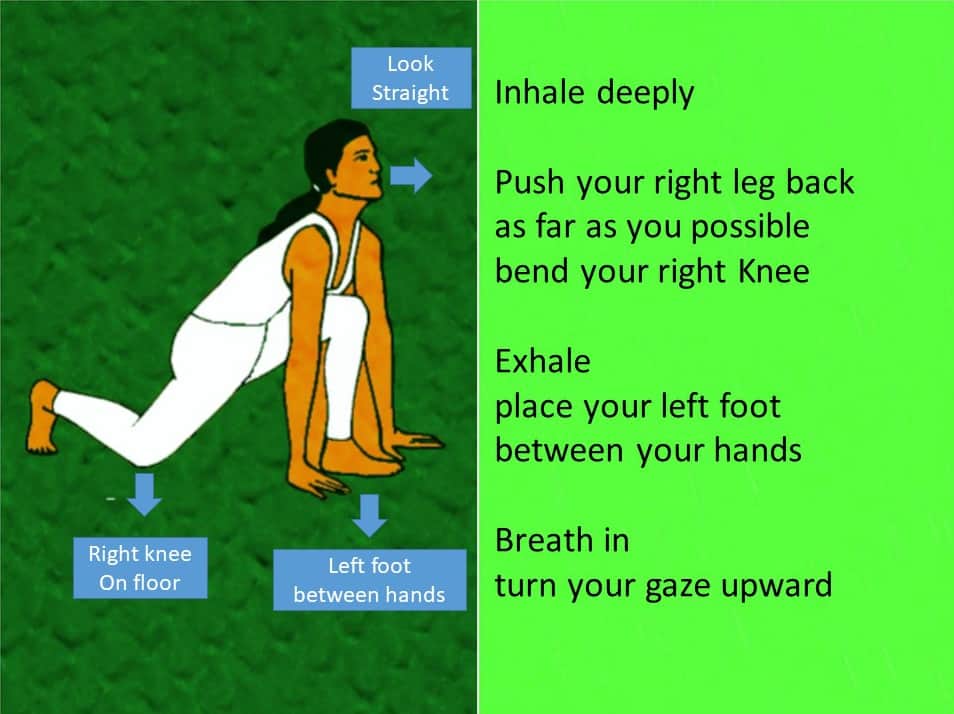
Surya Namaskar Step 4: Equestrian pose – Ashwa Sanchalanasana
- Keep your palms on the yoga mat and while inhaling push your right leg back as far as possible.
- As you exhale place your left leg between your palms with the knee bent at 90 degrees.
- While inhaling stretch your neck and face to gaze upwards.
- For best results of Sun Salutation steps, make sure that the left foot is in between the palms pressed on the floor.
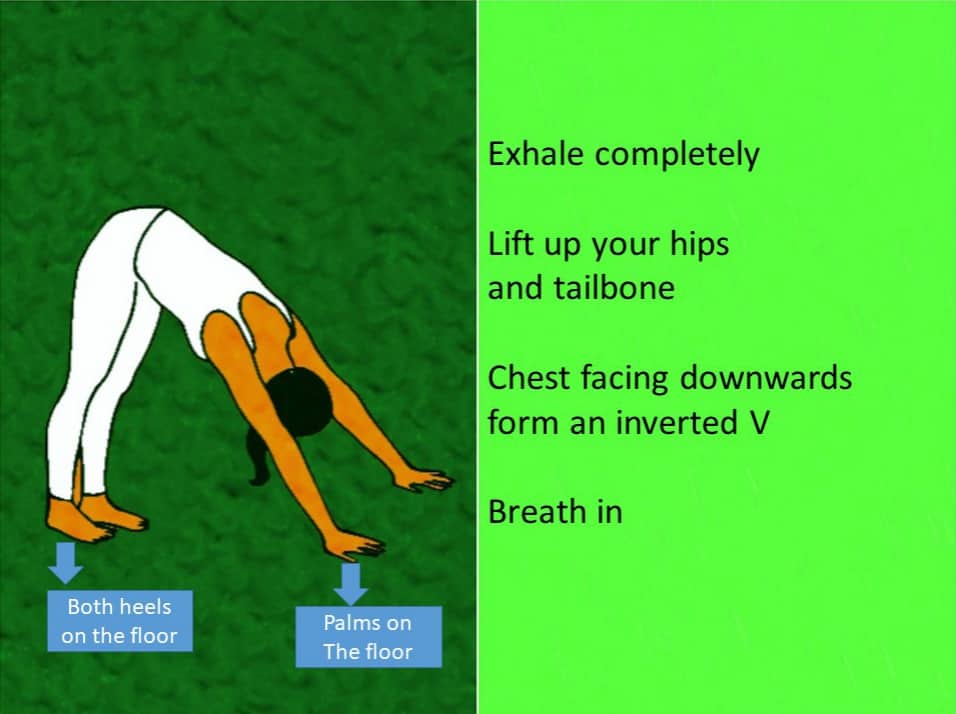
Surya Namaskar Step 5: Staff Pose – Dandasana
- Exhale and bring your left leg backwards.
- Lift your hips and tailbone with your head and chest facing downwards to form an inverted V.
- Make sure both the heels and palms are flat on the yoga mat.
- Inhale
- In many schools of yoga, this step of Surya namaskar is also completed by keeping the body in straight line legs stretched out as far back as possible like a straight plank.
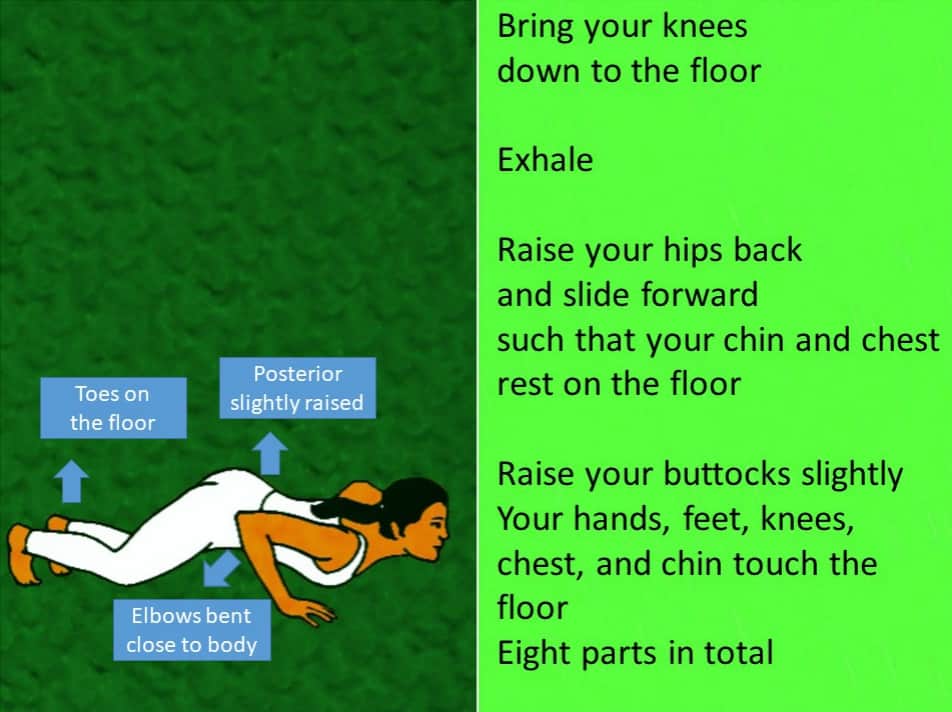
Surya Namaskar Step 6: Eight Limbed Pose – Ashtangasana
- Bring your knees down on the yoga mat as you exhale.
- Raise your hips, back and slide forward so that your chin and chest rest on the mat.
- Here your toes should be on the floor as per the image below.
- Keep your buttocks slightly raised, elbows bent, feet, knees, chest and chin touching the mat.
- It is necessary for the efficacy of this step that eight parts of your body are touching the floor at the end of the step. That is why it is called the Eight Limbed Pose Step in Surya Namaskar.
Sun Salutation Step 7: Cobra Pose – Bhujansasana
- Slide your body forward
- Raise your chest in the Cobra Pose
- Inhale with your chin up and looking straight
- Using your hands push your body up on your elbows slightly bent
- Exhale completely
- To get this step right as you inhale, push the chest forward and as you exhale, push the navel down to the floor. Always remember to tuck the toes under in this step of Surya Namaskar.
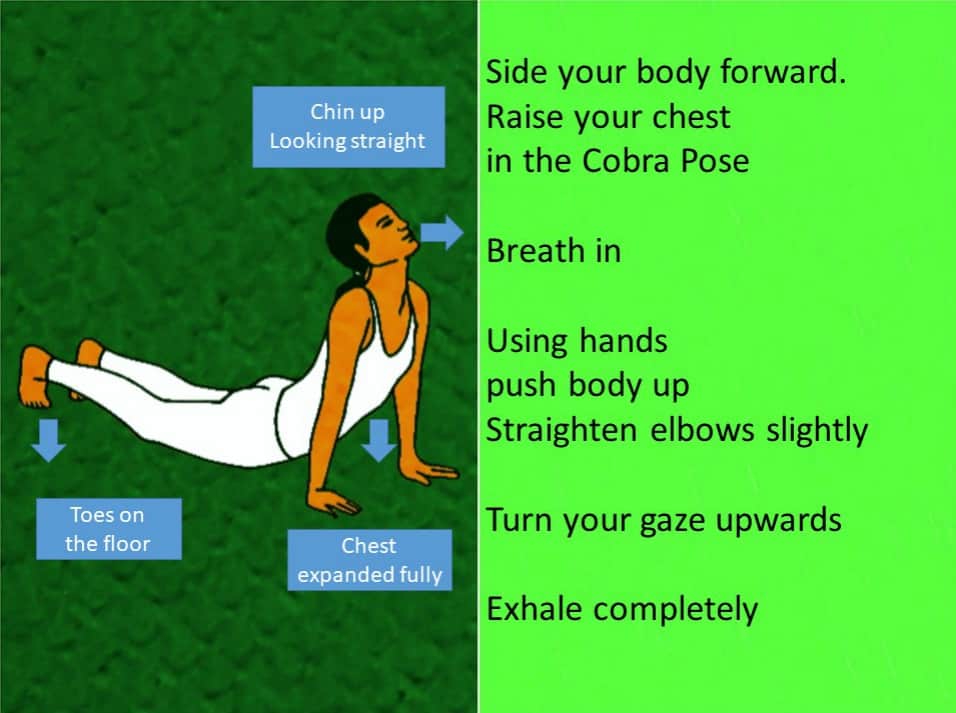
Cobra Pose or Bhujangasana is an integral part of Sun Salutation – Sequence and Benefits
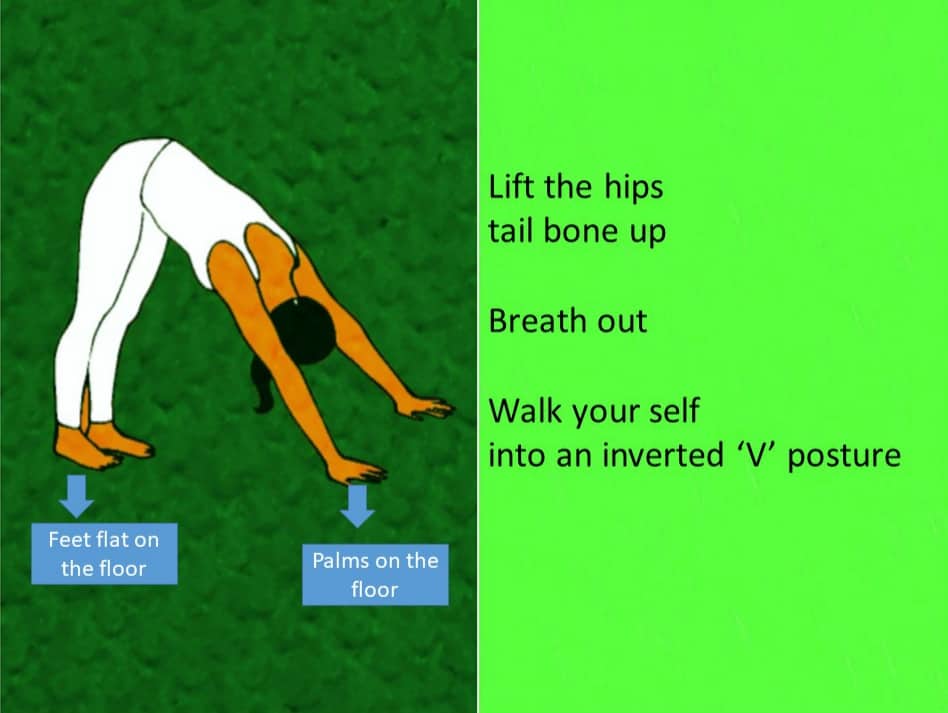
Sun Salutation Step 8: Mountain Pose- Parvatasana
- Lift the hips and tail bone up
- Exhale
- With your feet flat on the mat walk yourself ahead into an inverted V posture.
- This pose/Step of Surya Namaskar is easy to achieve if you literally walk yourself into a mountain or inverted V.
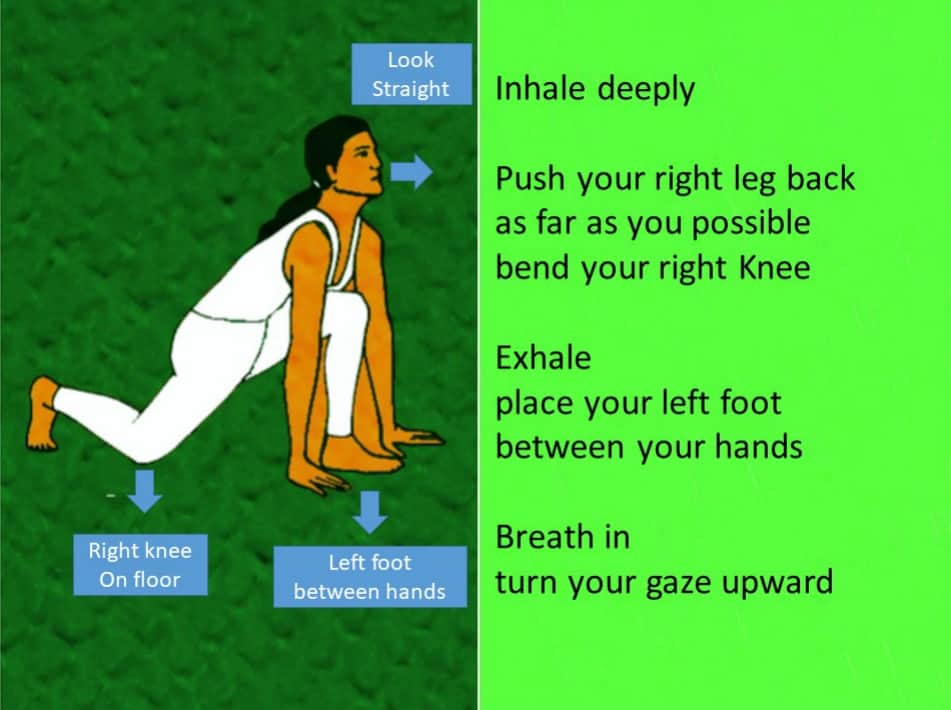
Sun Salutation Step 9: Equestrian pose – Ashwa Sanchalanasana
- Inhale deeply as you push your right leg back as far as you possibly can while bending the right knee slightly.
- Exhale and place your left foot between your palms on the mat with the left knee at 90 degrees.
- Inhale and turn your neck and chin to gaze upwards.
- For best results in this position of Sun Salutation, push the hips down towards the floor, to deepen the stretch and breathe in as deep as possible.
Surya Namaskar Step 10: Standing Forward Bend –Pada-Hastasana
- Exhale completely as you rise up by bending forward from the waist – keeping the spine straight.
- Your hands remain flat on the mat as you bring your right foot forward placing it next to the left foot.
- Make sure your knees don’t bend if possible and keep your feet and legs side by side.
- Keep your face towards your knees.
- In case you tend to bend your knees – gently, straighten them as you achieve balance and try and touch your nose to the knees.
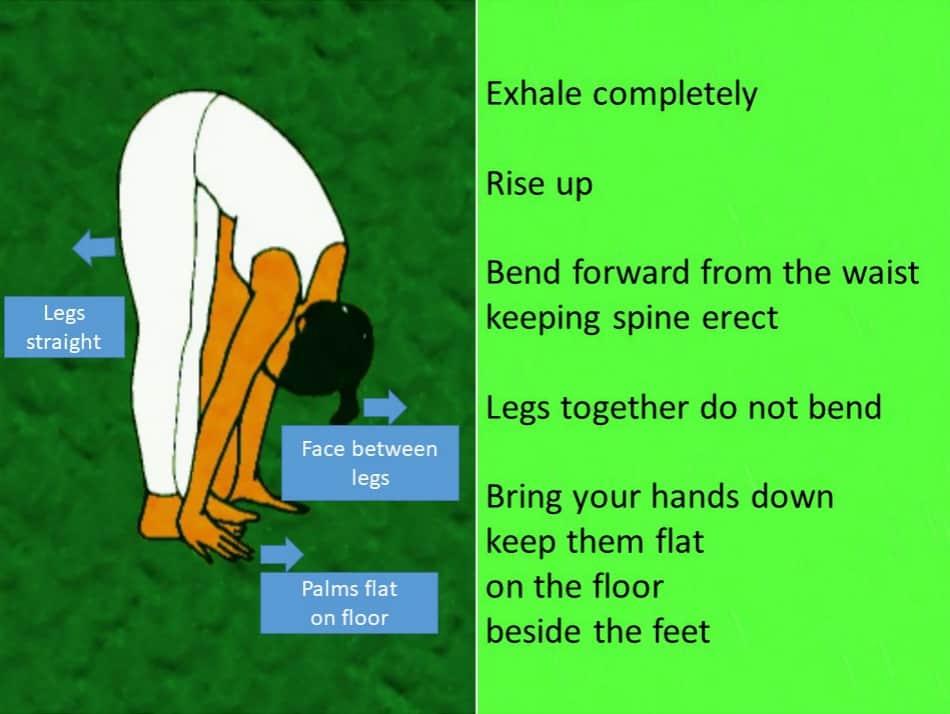
Step 11: Raised Arms Pose – Hastauttanasana
- Inhale as you lift your arms and torso with your arms stretched out and then upwards and then backwards.
- Keep your biceps close to your ears.
- Stretch your outstretched arms as far back as possible so that your entire body gets nicely stretched.
- The idea is to stretch up and backwards as much as possible in this step of Surya Namaskar.
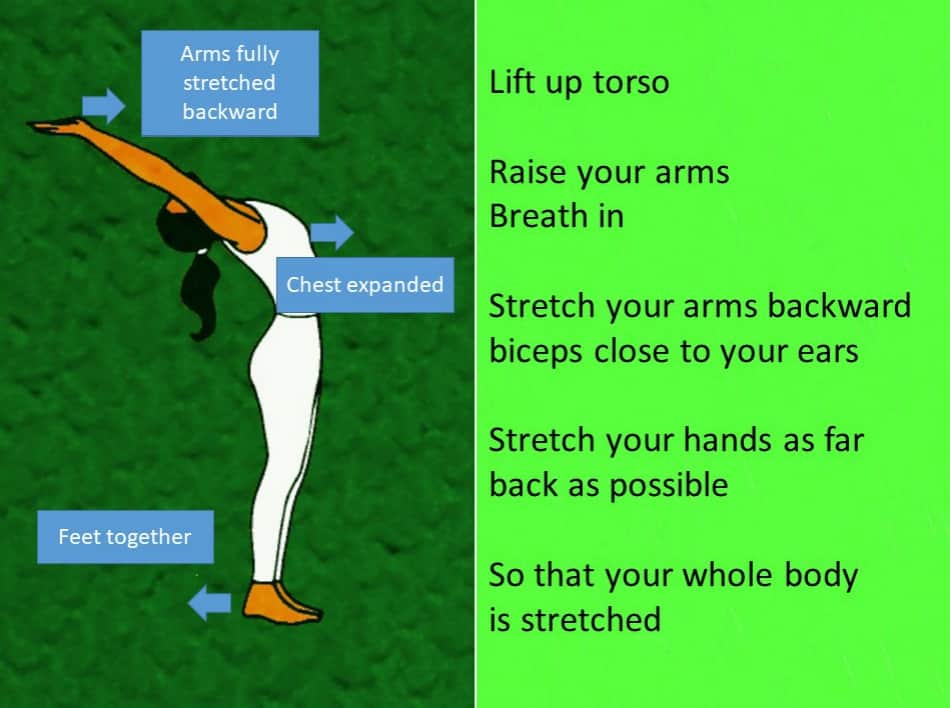
Step 12: Payer Pose – Pranamasana
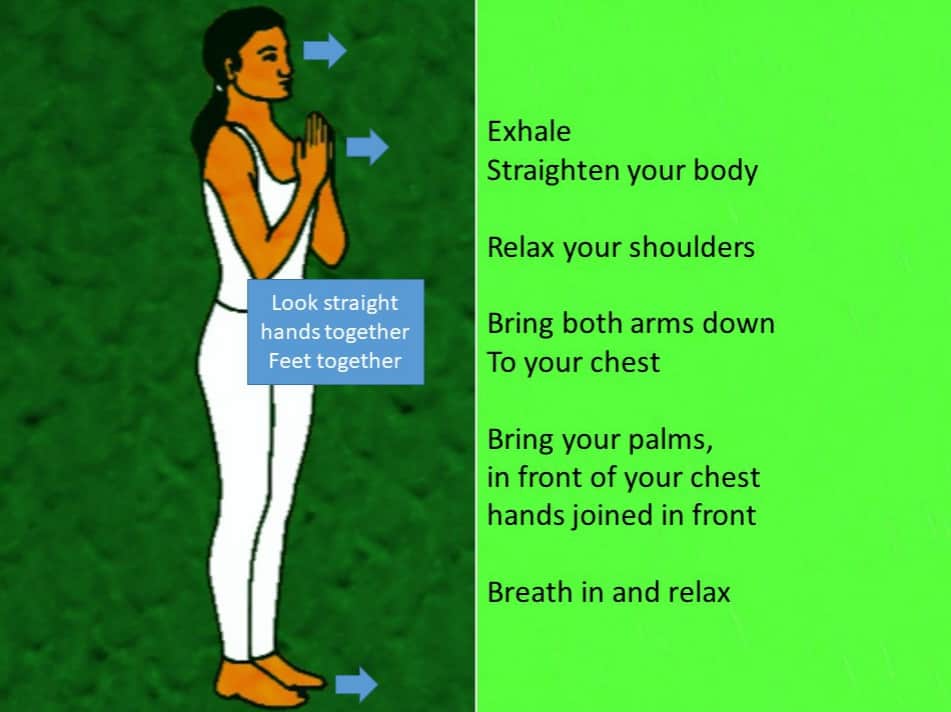
- As you exhale drop bring your arms straight upwards and then drop them gently to fold your hands in a namaste with relaxed shoulders.
- Look straight ahead standing straight with feet together, palms touching each other in a prayer pose.
- Breathe in and relax.
- With this, you have completed one set of the Sun Salutation 12 poses. To repeat all you need to do is change the foot you are pulling back and bending at the knee in steps 4 and 9.
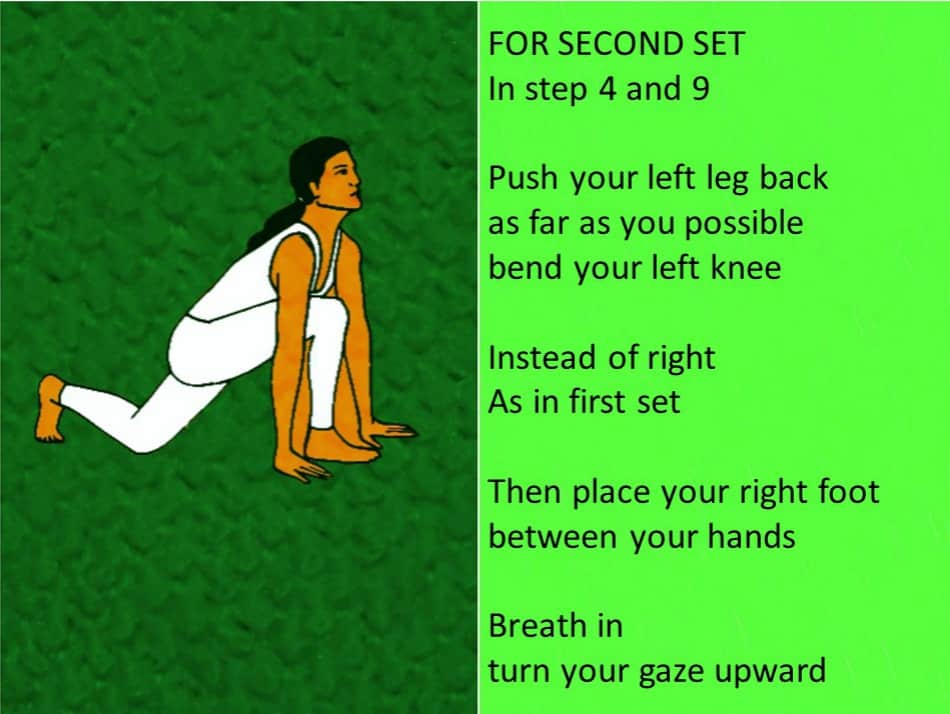
13. Second Set of Sun Salutation Steps
- When you practise the second set – during step 4 and 9 – push your left leg back as far as possible and bend your left knee instead of the right.
- Then, place your right foot between your hands.
- Breathe in and turn your gaze upwards.
Watch – Sun Salutation Step by Step Video:
Other must-watch links:
Begin Sun Salutation today and for the next 10 days, start your day with 3-5 rounds of Sun Salutation. Slowly increase them to 12 rounds of Sun Salutation, followed by other yoga poses and you will find that you have an energy-filled day that is a breeze both physically and mentally.
Happy Sun Saluting!
In case you have any query on How to do Surya Namaskar feel free to leave a comment or write to us on [email protected]. I will get back to you with any clarification required.
Related Articles:
Tips for Surya Namaskar – When Where How – Do’s and Don’ts of Sun Salutation
Natural Remedies to Treat Allergies while you Stay at Home
Short Motivational Frog Story about Success
12 Most Famous Food Quotes of all Times
Best time to do Surya Namaskar or Sun Salutation
10 Health Benefits of Surya Namaskar
Corpse Pose (Shavasana) in Yoga
Albert Einstein Quotes About Life Love and Education
How to do the Headstand? What are the benefits of Sirsasana?
Do’s and Don’ts of Yoga during Pregnancy – Poses Recommended

