Before we start Yoga Poses let us first understand how to prepare for Yoga at home and what are the prerequisites to start the practice.
A lot of people follow religious leaders without really knowing the purpose of life. Only satisfied with the rituals and traditions. Yoga imparts practical and scientific techniques to find the truth through the experience – all within you. As per Yogic science, the real truth can be experienced only when you transcend the senses. Truth is found when your mind and intellect cease to function.
Mind, Body and Soul – Alignment as a pre-requisite for Yoga
Beyond the ever-changing consciousness of mind and intellect lies the changeless and formless Spirit. It is the spirit who remains unaffected often veiled inside you according to your stage of evolution. As per Patanjali “Yoga is the suspension of the modification of the mind.” The mind can be controlled once you know how to control the “prana” (Life Source).
Your Prana and Mind are interconnected.
You must have seen people with the connection in their breath and prana – when they are thinking deeply or are in a meditative stage. The more the prana and mind are connected the slower will be your breath. However, when your mind is filled with negative thoughts – your breathing will become shallow and irregular. Thus, for sure there is a strong interconnectedness of the mind with the prana.
The Purity of Mind through Pranayama to prepare for Yoga Poses:
The purity of mind happens with the purity of the body in which it lives. By the practice of Breathing (Prayamama) and Yoga Asanas (poses), the mind becomes focused on one point. Thus, you can progress quickly in concentration and meditation.
You know for a fact that vital energy is prevalent in all living beings. You absorb prana through food, water, sunlight, etc. The knowledge and control of “Prana” are called Pranayama.
The highest manifestation of Prana is thought. The lowest manifestation of Prana in your body is in the movement of lungs. If you stop the lungs, all other motions in the body automatically stop. Thus, to control the subtle Prana – through relaxation and Pranayama you start controlling the breath. You need to do relaxation and Pranayama to prepare for Yoga Poses so that you experience the control over your mind.
One of the most common questions asked: What is the First Step of Yoga at home – is answered by three following instructions:
The First Steps to prepare for Yoga at home?
There is MAGIC in BREATHING!
It is the easiest and simplest way to learn Yoga from scratch!
You will be surprised to know you can control of breath by controlling the way you exhale – NOT the way you inhale. Your energy can be renewed by releasing your breath in an orderly manner. Unlike what you may have been thinking. Energy is not renewed by pumping in the air in the lungs.
Let us do a simple test when you step under a cold shower – it is normal to gasp and tense your muscles. You may not know it further enhances the torture. Instead, if you try to breath out in a steady purry breath – you will be astounded by how less you will be affected by the temperature of the water. It is by exhaling that your body will accommodate itself to change.
As you will read on – you will understand how to relax your mind and body through the three steps described in detail for your easy understanding.
Let us embark on this journey together to learn Yoga from scratch!
Step A, B and C: 4 Minutes
A. Set the Mood for Yoga at Home
Before you start to learn Yoga in any form or Poses, the first step of Yoga is to set the mood, relax your mind, body and soul and calm yourself by deep breathing.
Find a quiet and peaceful spot at home. If weather permits go out on your backyard or terrace garden. Spread your mat in an east-west direction. Make sure you haven’t eaten 3.5 hours and haven’t drunk anything 1 hour before the practice.
The time spent on doing these three steps should be approximately 4-5 minutes.
Here is how to start to learn Yoga from Scratch:
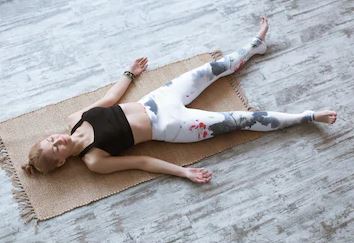
- First and foremost, lie on your back on the Yoga mat or a rug with your toes pointing towards the east direction. (If you do it in the evening – point towards west direction – in alignment with the energies of the sun.)
- Keep your legs a little apart (see pic below), feet towards each side, hands slightly away, palms facing up, lips and eyes gently closed. Feet pointing towards the East direction (always). Think you are about to start a beautiful journey where your mind, body and soul will be aligned. Leave behind the thoughts of the past and future. Appreciate the present moment, in gratitude, for your mind, body and soul to calm yourself.
- Breathe deeply and silently without any sound through your nose for 8 breaths in and 8 out.
- Then you start to relax each and every part of your body. Start with your toes, feet, ankles, calves, knees, thighs, hips, buttocks, pelvis, lower back, lower abdomen, middle back, middle abdomen, upper back, heart and lungs, shoulder blades and shoulder joints, arms, biceps, elbows, forearm, palm, fingers, neck, throat, face, lips, chin, jaw, eyes, nose, cheeks, ears, forehead, head. Always do this – starting from foot and going up to the topmost part of the body.
B) Abdominal Breathing
You should breathe deeply through your nose while doing the above. Move your abdomen upwards on inhalation and inward on exhalation. The Diaphragm Muscle in your body separates the abdominal area from the chest area (see pic below).
Thus, when you inhale the diaphragm pushes the organs in your body downwards. Moreover, it helps stimulate and massages your liver. The diaphragm, when pushed down, creates a vacuum in the lungs and when you inhale fills lungs with fresh air. Abdominal breathing causes your lung capacity to increase – because it fills the lowest potions of your lungs with oxygen and also oxygenates the blood. Thus, clearing your lungs of the stagnant air.
Always, breathe silently and deeply – never noisily.
The Diaphragmatic Functions of Breathing

C) Relaxation
Relax by intentionally paying attention to various body areas – to make you Learn Yoga from scratch experience – smoother and easier.
Keep lying on the yoga mat and roll your legs and feet sideways. Lift hips up and drop them. Chest up and drop. Roll your head from side to side. Your body and mind both have to be together while you relax. Feel if there is any tensed part of your body and shake it to relax that area.
Next, bring your attention to start becoming aware of your body.
Remember, CONCENTRATION IS NECESSARY FOR RELAXATION.
Let gravity relax your body – leave your weight on the yoga mat fully and just relax.
Easy Yogic Breath Control – Pranayama (4+4 minutes)
Pranayama (Breathing in Yoga) is the best method to prepare for Yoga and learn from scratch. It should always be done before any Basic Yoga Poses at any time. There are two most important types of Pranayama to do before you start with the other Yoga Asanas – Kapalbhati followed by Anuloma Viloma.
Tips:
- Always face the east in the morning and west in the evening when you do Pranayama.
- Never eat 3-4 hours before you start. It is the easiest way to boost immunity and freshen your mind before you start working each day.
- You can also do it whenever you feel fatigued, experience low energy or a heavy head as long as your stomach is empty.
“Pranayama is the link between mental and physical disciplines. While the action is physical, the effect is to make the mind calm, lucid and steady.”
– Swami Vishnudevananda
First PranayamA – learn yoga from scratch
Kapalbhati (4 minutes)
How to do the Kapalabhati Pranayama – Steps, Images, Video and Benefits?
Are you learning Yoga from Scratch?
Always try and practise Kapalbhati in the morning since it helps to activate the nervous system and may not let you sleep. Thus, always do Kapalbhati to prepare for Yoga, never towards the end of the day.
Tip: Never do this Basic Yoga Pose if you are experiencing cramps or abdominal pains.
Beginners can start with 20-30 pumpings each. Slowly and gradually increase them to 5 rounds of 50-100 pumpings (Watch our Video demonstrating Kapalbhati in detail)
(1 pump = 1 inhalation + 1 exhalation)
-
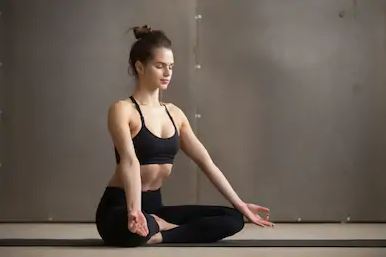
- Sit in a cross-legged position comfortably with your back straight and erect. Place your hands on your knees in Gyan or Chin Mudra (the tip of the thumb and the index finger are joint, while the other three fingers are stretched out). Also, make sure your back and shoulders do not move and are always erect. Keep your face relaxed as well.
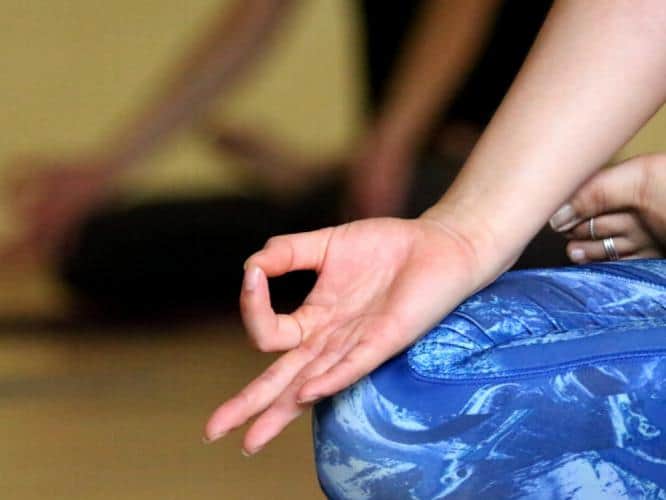
Gyan or Chin Mudra - Take a big and deep breath in. Feel the air as it fills up your lungs.
- Soon after, as you exhale out through the nose, contract your stomach muscles in towards the spine. Stretch as much as you comfortably can.
- When you begin to relax your abdomen, your breath will automatically flow into your lungs. Take 20-30 pumping of breaths to complete one round of Skull Shining Breathing Kapalabhati Pranayama.
- After completing the round follow with two or three deep breaths and then retain your breath for 30-60 seconds 9or as comfortable). Remember, to focus on your third eye chakra.
- Relax your body with your eyes closed and feel the sensations in your body. The sensations are the prana (life force) as it starts moving up your spine.
Practice two or more rounds of Skull Shining Breathing Kapalabhati Pranayama. Once you are comfortable, you can increase to 5 rounds of 50-100 pumping of breath.
- Sit in a cross-legged position comfortably with your back straight and erect. Place your hands on your knees in Gyan or Chin Mudra (the tip of the thumb and the index finger are joint, while the other three fingers are stretched out). Also, make sure your back and shoulders do not move and are always erect. Keep your face relaxed as well.
Benefits of Kapalabhati Pranayama
- Cleanses your nasal passage and lungs. Also detoxes your entire respiratory system.
- Increases lung capacity and makes them stronger.
- Drains the sinuses and prevents mucus from forming in the chest, also eliminates a huge amount of Carbon dioxide from your body. Thus, helping red blood cells to soak in much more oxygen. As a result, it renews body tissues.
- You get relieved from asthma if you practise this basic Yoga Pose over a period of time. Never, attempt to do it if you are having an asthmatic attack.
- Excellent for strengthening the abdomen muscles and also massages the liver, spleen, stomach, pancreas as well as your heart. Best suited if you want to improve digestion.
Remember, Kapalbhati is one of the most popular and beneficial of all Breathing Activities to prepare for Yoga – done across the world by millions of Yogis.
Watch Video where our International Yoga Trainer teaches you how to do Kapalbhati:
Second Pranayama – learn yoga from scratch
Anuloma Viloma (4 Minutes)
How to do Anuloma Viloma Alternate Nostril Breathing – Steps, Images, Video and Benefits?
How to prepare for Yoga for beginners or to learn from scratch:
It is one of the main forms of Pranayama or breath control and is suitable to prepare for Yoga Poses (How to do 12 Basic Yoga Poses). Literally means “to control Prana or vital energy”. This unique method of breathing helps correct negative breathing habits and to balance both the sides of your brain.
- Sit in a cross-legged position, spine erect and shoulders relaxed. Close your eyes with your face straight ahead. If you cannot sit cross-legged – sit on a straight-backed chair with your bare feet firmly on the floor.
- Raise your right hand with fingers in Vishnu Mudra by folding the index and middle finger under the base of the thumb. (In case you are a lefty – use your left hand). Place your left hand in Chin Mudra on your left knee with palm facing upwards.

Vishnu Mudra – Right-Hand fingers - Inhale completely through the left nostril for a count of 4, while keeping the right nostril closed by your thumb.
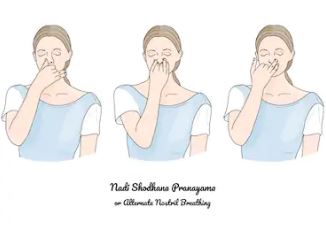
- Close the left nostril with the two ends of your ring and little fingers so that both the nostrils are closed. Hold this to the count of 16. Tip: Beginners can hold the breath for 4 counts.
- Release the right nostril and exhale out to the count of 8. Tip: Always exhale double than the counts you inhale. Try and exhale slowly and gradually to make it last got longer counts). If you cannot exhale for 8 counts as you begin – start with 4 for the first 1-2 weeks and then gradually go to 8 counts.
- Inhale fully through the right nostril to the count of 4. Tip: Do not inhale forcibly – ever!
- Close both the nostrils and retain the breath to the count of 16. Tip: Beginners can hold your breath for 16 counts you could hold for 4 or 8 counts.
- Release the left nostril and exhale out to the count of 8.
This completes one round of Anulom Vilom (Alternate Nostril Breathing) Pranayama.
Watch Video where our International Yoga Trainer teaches you how to do Anuloma Viloma:
HOW MANY ROUNDS OF ANULOM VILOM (PRANAYAMA) TO DO IN A DAY?
Benefits of Anuloma Viloma
- By doing Anuloma Viloma – your entire respiratory system and lungs get cleansed and become stronger.
- Since you exhale twice more than you inhale – the stale air in your lungs is expelled during the process.
- When you retain your breath the rate of gaseous exchange in the lungs increases manifolds – sending in more oxygen to the bloodstream. Also, more CO2 is sent to the lungs to be let out during exhalation.
- It also helps to balance both the hemispheres of the brain.
No Yoga Poses sequence are complete without Anuloma Viloma or Alternate Nostril Breathing. How can you breathe smoothly and effortlessly during basic Yoga Poses if you do not prepare for Yoga and do the necessary prerequisites? Never skip these three steps above to learn Yoga from Scratch.
Here I would suggest that throughout the time you prepare for Yoga Asanas (Postures) stay positive and be gentle with yourself. Especially so, when you come out of the relaxation quietly. Remember, whenever you practice Paryanayama heat and energy are produced. When you practice for a long time you will be free of impurities.
Start to Prepare for Yoga – and be successful in learning Yoga from scratch – Always with a SMILE in your heart!
Happy World Yoga Day!