What are the 12 Basic Yoga Poses (Asanas), especially for beginners – is one of the most asked questions each year before the World Yoga Day celebrated on 21st Jun.
So, here I have compiled the 12 Basic Yoga Poses for all our readers from across the globe and for all of you who want to understand the Yoga Poses and their Sequence.
Our readers and followers on Youtube and Website have been asking questions related to Basic Yoga Poses. It inspired us to compile this detailed article with Names in Sequence for all the 12 easy basic Yoga Poses, with their benefits.
The Questions I have answered through the Yoga Poses ar:
-
What are the 12 basic Yoga Postures – and how to get started?
-
What are the yoga asanas meant for beginners to do daily?
-
How long do you hold a yoga pose?
-
When and How do you do yoga poses? For how long should each Yoga Pose Last?
-
What is yoga asanas for beginners?
-
What are the basic Yoga Positions?
The Basic Yoga Asanas (Poses) are also called Classic Yoga Asanas with their Images, Names, Steps and Benefits. Here is the chart for you to understand the sequence of the Yoga Poses.
What are the 12 Basic Yoga Postures (Asanas) Images with Names, Steps and Benefits?
We start our article with: How to Prepare for Yoga Poses followed by the 12 Easy Classic Yoga Poses. After the preparation, you will understand how to do the two main Breath Control Practices – Pranayama before we proceed to the 12 basic yoga asanas
There are many more advanced Yoga Asanas (Poses) but not meant for beginners, therefore not listed here.
12 Basic Yoga Asanas in Sequence (A Chart)
A. Preparation to Yoga
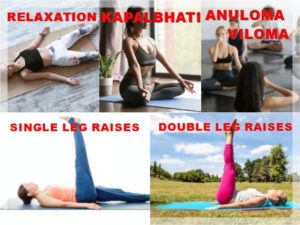
B. Breath Control or Pranayama – Kapalbhati and Anuloma Viloma
1. Surya Namaskar or Sun Salutation (Followed by Relaxation in Shavasana Corpse Pose )
SUPINE or LYING on your back – BASIC YOGA POSES:
2. Uttanpadasana or Single and Double Leg Raises (Followed by Relaxation in Shavasana Corpse Pose To Know More)
3. Sarvangasana or Shoulder Stand (Followed by Relaxation in Shavasana Corpse Pose To Know More)
4. Matsyasana or Fish Pose
5. Pascimottanasana or Sitting Forward Bend Pose
6. Purvottanasana or Inclined Plane (Followed by Relaxing on your abdomen)
Lying on your abdomen – BASIC YOGA POSES:
7. Bhujangasana or Cobra Pose (Followed by Lying down in a Child’s Pose to RelaxTo Know More)
8. Ardh-Salbhasana or Half-Locust Pose
9. Dhanurasana or Bow Pose (Followed by Relaxation in Shavasana Corpse Pose To Know More)
Sitting Up – Basic Yoga Poses:
10. Ardh-Matsyendrasana or Half Spinal Twist (Relaxation in Shavasana Corpse Pose To Know More)
11. Pada Hastasana or Standing Forward Bend Pose
12. Trikonasana or Triangle Pose (Final Relaxation in Shavasana or Corpse Pose)
Lastly, Final Prayers (as per choice)
What are the 12 Basic Yoga Postures (Asanas) Images with Names, Steps and Benefits?
Most of the articles and videos on the internet forget to emphasise that before you begin the 12 Basic Yoga Poses (Asanas) – one should spend roughly 8 minutes in Setting the Mood, Breathing (Pranayama) and Breathing.
Why?
Because Yoga is all about the breath and body and how they are intertwined. You can only do all the Essential Yoga Poses successfully when you are in a relaxed state of mind and body.
The First Steps to prepare for Yoga (8 minutes)?
One of the most common questions asked: What is the First Step of Yoga – is answered by three following instructions:
A. Set the Mood for Yoga
B. Abdominal Breathing
C. Relaxation
The first step of Yoga is to set the mood, relax your mind, body and soul and calm yourself by deep breathing. The time spent on doing these three steps should be approximately 8 minutes or so.
Here is how to do it:
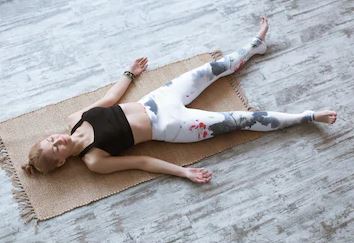
A) Set the Mood for Yoga
- First and foremost, lie on your back, legs a little apart (see pic below), feet towards each side, hands slightly away, palms facing up, lips and eyes gently closed. Feet pointing towards the East direction. Think you are about to embark on a beautiful journey where your mind, body and soul will be aligned. Leave behind the thoughts of the past and future. Appreciate the present moment, in gratitude, for your mind, body and soul to calm yourself.
- Breathe deeply and silently without any sound through your nose for 8 breathes in and 8 out.
- Then you start to relax each and every part of your body. Start with your toes, feet, ankles, calves, knees, thighs, hips, buttocks, pelvis, lower back, lower abdomen, middle back, middle abdomen, upper back, heart and lungs, shoulder blades and shoulder joints, arms, biceps, elbows, forearm, palm, fingers, neck, throat, face, lips, chin, jaw, eyes, nose, cheeks, ears, forehead, head. Always do this – starting from foot and going up to the topmost part of the body.
B) Abdominal Breathing
You should breathe deeply through your nose. Move your abdomen upwards on inhalation and inward on exhalation. The Diaphragm Muscle in your body separates the abdominal area from the chest area (see pic below).
Thus, when you inhale the diaphragm pushes the organs in your body downwards. Moreover, it helps stimulate and massages your liver. The diaphragm, when pushed down, creates a vacuum in the lungs and when you inhale fills lungs with fresh air. Abdominal breathing causes your lung capacity to increase – because it fills the lowest potions of your lungs with oxygen and also oxygenates the blood. Thus, clearing your lungs of the stagnant air.
Always, breathe silently and deeply – never noisily.
The Diaphragmatic Functions of Breathing

C) Relaxation
Relax by intentionally paying attention to various body areas – to make your Basic Yoga Poses experience smoother and easier.
Keep lying on the yoga mat and roll your legs and feet sideways. Lift hips up and drop them. Chest up and drop. Roll your head from side to side. Your body and mind both have to be together while you relax. Feel if there is any tensed part of your body and shake it to relax that area.
Next, bring your attention to start becoming aware of your body.
Remember, CONCENTRATION IS NECESSARY FOR RELAXATION.
Let gravity relax your body – leave your weight on the yoga mat fully and just relax.
Easy Yogic Breath Control – Pranayama (4+4 minutes)
Pranayama (Breathing in Yoga) should always be done before any Basic Yoga Poses at any time. There are two kinds of Pranayama to do before you start with the other Yoga Asanas – Kapalbhati followed by Anuloma Viloma.
Tips:
- Always face the east in the morning and west in the evening when you do Pranayama.
- Never eat 3-4 hours before you start. It is the easiest way to boost immunity and freshen your mind before you start working each day.
- You can also do it whenever you feel fatigued, experience low energy or a heavy head as long as your stomach is empty.
“Pranayama is the link between mental and physical disciplines. While the action is physical, the effect is to make the mind calm, lucid and steady.”
– Swami Vishnudevananda
First Pranayam – Kapalbhati (5 minutes)
Second Pranayama – Anulpma Viloma (5 Minutes)
How to do the Kapalabhati Pranayama – Steps, Images, Video and Benefits?
Always try and practise Kapalbhati in the morning since it helps to activate the nervous system and may not let you sleep. Never do this Basic Yoga Pose if you are experiencing cramps or abdominal pains.
Beginners can start with 20-30 pumpings each. Slowly and gradually increase them to 5 rounds of 50-100 pumpings
(1 pump = 1 inhalation + 1 exhalation)
-
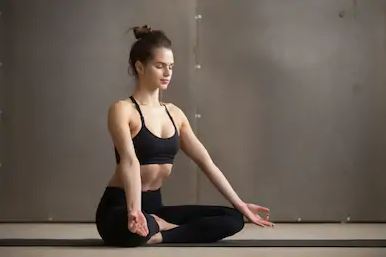
- Sit in a cross-legged position comfortably with your back straight and erect. Place your hands on your knees in Gyan or Chin Mudra (the tip of the thumb and the index finger are joint, while the other three fingers are stretched out). Also, make sure your back and shoulders do not move and are always erect. Keep your face relaxed as well.
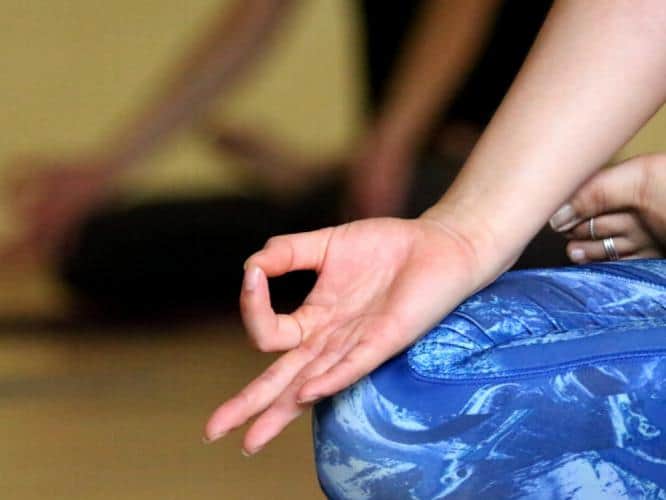
Gyan or Chin Mudra - Take a big and deep breath in. Feel the air as it fills up your lungs.
- Soon after, as you exhale out through the nose, contract your stomach muscles in towards the spine. Stretch as much as you comfortably can.
- When you begin to relax your abdomen, your breath will automatically flow into your lungs. Take 20-30 pumping of breaths to complete one round of Skull Shining Breathing Kapalabhati Pranayama.
- After completing the round follow with two or three deep breaths and then retain your breath for 30-60 seconds 9or as comfortable). Remember, to focus on your third eye chakra.
- Relax your body with your eyes closed and feel the sensations in your body. The sensations are the prana (life force) as it starts moving up your spine.
Practice two or more rounds of Skull Shining Breathing Kapalabhati Pranayama. Once you are comfortable, you can increase to 5 rounds of 50-100 pumping of breath.
- Sit in a cross-legged position comfortably with your back straight and erect. Place your hands on your knees in Gyan or Chin Mudra (the tip of the thumb and the index finger are joint, while the other three fingers are stretched out). Also, make sure your back and shoulders do not move and are always erect. Keep your face relaxed as well.
Watch Video where our International Yoga Trainer teaches you how to do Kapalbhati:
Benefits of Kapalabhati Pranayama
- Cleanses your nasal passage and lungs. Also detoxes your entire respiratory system.
- Increases lung capacity and makes them stronger.
- Drains the sinuses and prevents mucus from forming in the chest, also eliminates a huge amount of Carbon dioxide from your body. Thus, helping red blood cells to soak in much more oxygen. As a result, it renews body tissues.
- You get relieved from asthma if you practise this basic Yoga Pose over a period of time. Never, attempt to do it if you are having an asthmatic attack.
- Excellent for strengthening the abdomen muscles and also massages the liver, spleen, stomach, pancreas as well as your heart. Best suited if you want to improve digestion.
How to do Anuloma Viloma Alternate Nostril Breathing – Steps, Images, Video and Benefits?
It is one of the main forms of Pranayama or breath control. Literally means “to control Prana or vital energy”. This unique method of breathing helps correct negative breathing habits and to balance both the sides of your brain.
- Sit in a cross-legged position, spine erect and shoulders relaxed. Close your eyes with your face straight ahead. If you cannot sit cross-legged – sit on a straight-backed chair with your bare feet firmly on the floor.
- Raise your right hand with fingers in Vishnu Mudra by folding the index and middle finger under the base of the thumb. (In case you are a lefty – use your left hand). Place your left hand in Chin Mudra on your left knee with palm facing upwards.

Vishnu Mudra – Right-Hand fingers - Inhale completely through the left nostril for a count of 4, while keeping the right nostril closed by your thumb.
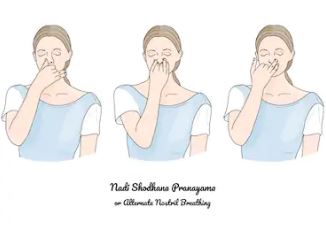
- Close the left nostril with the two ends of your ring and little fingers so that both the nostrils are closed. Hold this to the count of 16. Tip: Beginners can hold the breath for 4 counts.
- Release the right nostril and exhale out to the count of 8. Tip: Always exhale double than the counts you inhale. Try and exhale slowly and gradually to make it last got longer counts). If you cannot exhale for 8 counts as you begin – start with 4 for the first 1-2 weeks and then gradually go to 8 counts.
- Inhale fully through the right nostril to the count of 4. Tip: Do not inhale forcibly – ever!
- Close both the nostrils and retain the breath to the count of 16. Tip: Beginners can hold your breath for 16 counts you could hold for 4 or 8 counts.
- Release the left nostril and exhale out to the count of 8.
This completes one round of Anulom Vilom (Alternate Nostril Breathing) Pranayama.
Watch Video where our International Yoga Trainer teaches you how to do Anuloma Viloma:
HOW MANY ROUNDS OF ANULOM VILOM (PRANAYAMA) TO DO IN A DAY?
Benefits of Anuloma Viloma
- By doing Anuloma Viloma – your entire respiratory system and lungs get cleansed and become stronger.
- Since you exhale twice more than you inhale – the stale air in your lungs is expelled during the process.
- When you retain your breath the rate of gaseous exchange in the lungs increases manifolds – sending in more oxygen to the bloodstream. Also, more CO2 is sent to the lungs to be let out during exhalation.
- It also helps to balance both the hemispheres of the brain.
FIRST,
Basic Yoga Posture (Asanas): Surya Namaskar or Sun Salutation
Duration: 6 Sets – 3 right knee rounds and 3 left knee rounds
Number of Surya Namaskar for Beginners:
12 movements complete one round of Surya Namaskar. Two rounds complete – one set. It is one of the most beneficial for overall body fitness, flexibility, and strength and one of the Sets of Easy and Basic Yoga Poses. You just have to get the rhythm right after one week of practice.
Tip: Remember to always lay emphasis on the details of the practice of all the basic yoga asanas (poses) with awareness rather than doing it just mechanically. Do it slowly so that you are not breathless by the end of one round.
Steps of Surya Namaskar or Sun Salutation
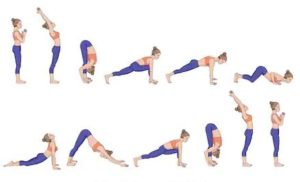
Pose 1:
Hands folded in Namaste, feet together standing on the top of the yoga mat. Breathe in and out.
Pose 2:
While you are inhaling, and arch upper back, stretch your abdomen, arms straight upwards and then backwards, head, back, legs and knees straight.
Tip: Make sure, your head doesn’t drop behind the arms to avoid any pressure on your lower back.
Pose 3:
Exhale as you bring your outstretched arms down bending forward with your hips towards your toes. Keep palms flat on the floor in line with the toes. Your palms should be flat even if you do not have much flexibility and may have to bend your knees. Make sure to keep your hands inwards towards the knee.
Pose 4:
Inhale and lift your head upwards bending your neck backwards, stretch your right leg all the way back, as your toes are pointing back, rest this leg on your knee.
Pose 5:
Retain your breath bring the body in a push-up position, with both the legs stretched all the way back. Remember, to keep your head up, pay attention to your hips – they should not sag nor be too high.
Pose 6:
Exhale while you lower your knees, chest and forehead in that order. Your hips are raised upwards. It is an exaggerated position.
Pose 7:
Inhale, while you slide your head forward, up and back. Arch back. Do not push up with arms. Use back muscles to bring your head up. Keep feet together with toes pointing backwards, push the lower abdomen towards the floor.
Pose 8:
Exhale as you go into an Inverted V position – heels down, arms straight, head down, legs straight. Keep your gaze towards your feet.
Pose 9:
Inhale, draw right foot forward between the hands with palms flat on the floor. Rest your body weight on the left knee.
Pose 10:
Exhale, and bring left foot forward keeping your hand son the palms on the floor and head bent forward and downward.
Pose 11:
Inhale, look up stretching your arms forwards and then upwards and then arch your back backwards with hands also arching backwards.
Pose 12:
Exhale and fold your arms in a Namaste before you return your arms to your side.
This is one round of Surya Namaskar as you used the right knee forward and backwards. When you do the same 12 Poses with your left knee forwards or backwards – it will complete one set of Surya Namaskar.
Thus, you begin with one round of right knee and then continue with one round with left knee – to complete one set of Surya Namaskar.
Tips: Always practise Surya Namaskar facing the east in the morning or west in the evening. Your stomach should be empty or you should eat at least3-4 hours before the practice. Follow Sun Salutation with the Corpse Pose for 3-4 minutes for best results.
You can follow our Guided Video with Surya Namaskar with all the 12 Positions – demonstrated with an explanation.
Benefits of Surya Namaskar or Sun Salutation:
- This Basic Yoga Pose enhances the mobility of your entire spine and stretches and strengthens dozens of muscles.
- When you bend forward and backwards – it messages the solar plexus which in turn promotes deep breathing from the abdomen.
- Inhalation on backwards bending and exhalation on bending forward increases the lung capacity.
- The contraction of muscles stimulates and relaxes the nervous system – eliminating stress. It acts as a nerve tonic.
- The sequence of going into one pose after another- stretches everything in your body. You can feel the stretch in your arms, armpits, hands, chest, abdomen, throat, hips, thigh muscles, back muscles and hamstrings. It also enhances the flexibility of pelvis, hips, neck, shoulders and upper back.
- It makes you feel vibrant and healthy. Moreover, it is a good warm-up for your entire body and the only Basic Yoga Pose that has the maximum benefits. Always practise this Yoga Asana before you go onto the other Yoga Postures.
Supine or LYING on your back – BASIC YOGA POSES:
Second,
Basic YOGA POSEs (ASANA): Uttanpadasana or Single and Double Leg Raises
In case you have severe back issues you may have difficulty in practising this Basic Yoga Posture (Asana). In case you feel uncomfortable in doing this Yoga Pose – try bending your one knee and placing it flat on the yoga mat. Keep the leg in this position while you raise your other leg.
It is one of the Easy Yoga Asanas for beginners who want to build muscle strength in your legs and abdomen.
A. Eka Pada Uttanpadasana or Single-Leg Raises (6 times each leg)
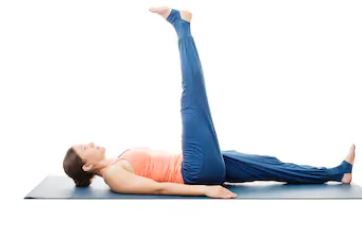
Steps:
- Lie down on your back in the Shavasana or Corpse Pose (See pic above) bring your legs together and place your hands next to your sides – palms facing down.
- As you inhale bring the right leg up to 90 degrees slowly counting 4. Hold the leg up to a count of 4. As you the legs straight – exhale and bring your leg down to a count of 4. Remember, when you touch your heel to the yoga mat – relax your face and legs.
- Repeat the above. However, do the same by raising your left leg.
- VARIATION for Beginners Who are doing 12 Basic Yoga Poses: In case you cannot raise your legs to 90 degrees don’t worry – raise your legs as much as you can comfortably do. Then, reach up to your leg using your hands and pull the leg towards your body.
- Continue to raise the alternate leg and bring it down until you complete 6 times for each leg.
Watch – your breathing!
How long do you hold the Pose?
When you raise each leg hold the pose for a count of 4 or for three breaths. When you are Holding the Pose – keep breathing deeply in and out.
Benefits of Single Leg Raises:
This basic Yoga Pose strengthens the back and abdominal muscles. Prepares you for other Yoga Postures to follow in the sequence.
B. Dwi-pada-Uttanpadasana or Double-Leg Raises (12 times both legs)
Remember, in case you have severe neck or back problems or sciatic pains – this Yoga Exercise is not meant for you.
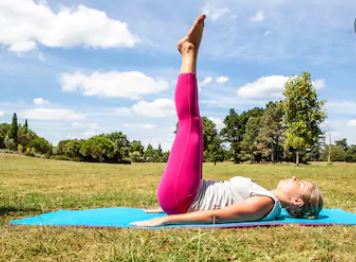
Steps:
- As you are lying on your back on the yoga mat in the Corpse Pose – bring your legs together and place your hands on your sides on the yoga mat with palms facing down.
- Inhale as you slowly raise both legs up to 90 degrees to a count of 4. Always, remember to bring your legs up slowly and gently without using too much pressure and not jerking them up.
- Exhale and bring your legs down to a count of 4. Repeat this 6 times
How long do you hold the Pose?
When you raise both legs hold the pose for a count of 4 or count 2-3 breaths as per your comfort. When you are Holding the Pose – keep breathing deeply in and out.
Benefits of Double Leg Raises:
Double leg raises help you strengthen your lower back and abdominal muscles. It also helps you lose belly fat.
Follow the Single and Double Leg Raises by Relaxation (Savasana or Corpse Pose) – To Know more
Third,
Basic Yoga Pose: Sarvangasana or Shoulder Stand
Soon after you have strengthened your abdominal and lower back muscles, you can practice this basic Yoga Pose called Sarvangasana or Shoulder stand pose without any difficulty. It is essential and important to relieve yourself from any spinal stiffness before you perform this pose. Here’s how to get into the pose –
Thus, follow every step mentioned below to get into the pose with ease.
(Note: If anyone has or had any kind of cardiovascular problems – do take written permission from your doctor before you practise the Shoulder Stand Pose (Asana).
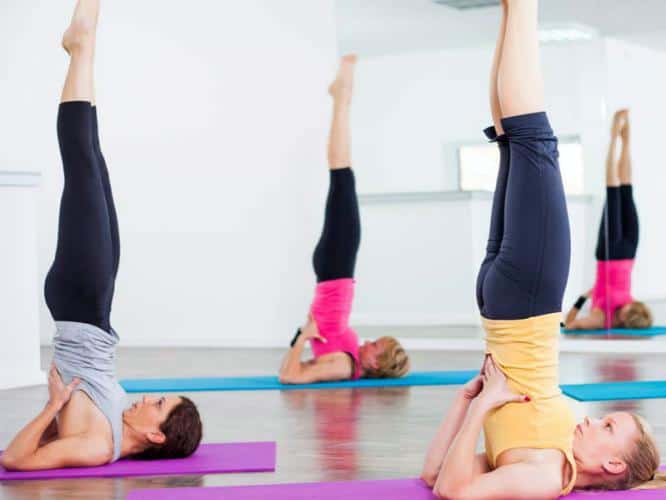
HOW TO DO SARVANGASANA OR SHOULDER STAND?
Step 1
Lie flat on your back, bring your feet together and stretch your arms behind your head to make sure there is space. While practising this Basic yoga pose – Sarvangasana or Shoulder stand make sure there is a foot or 30 cm space between the wall and your fingertips when you extend your arms.
Return the arms to the floor keeping them next to your hips with palms touching the yoga mat. Keep your head centred and breathe rhythmically in your abdomen.
Step 2
While your head and neck are on the mat, inhale and lift your straight legs at a 90-degree angle.
Step 3
Bring your hands onto your buttocks. Gently use your hands to push your body up by walking your hands down the back. Do not jump into the position by jerking your body up. The hands should support your body with thumbs outwards and fingers inwards on your waist. See above pic to understand clearly.
Breathe slowly into your abdomen and relax your legs and feet as much as possible. Hold this pose for a count of 4 or for three breaths or longer as per your comfort.
Remember to keep your head centred.
Step 4
Continue lifting your body until your legs are in a straight line with toes pointing at the ceiling. Take the help of the elbows to stand on your shoulders.
Step 5
Try and bring your chest as close to the chin as possible. Press your chin into the base of your throat and lock it in a chin-lock called ‘jalandhara bandha’. Breathe normally while in this position. Keep breathing and stay in the posture for 30 seconds gradually increasing the time to 3 minutes.
While practising shoulder stand pose the back of the neck, the posterior part of the head and shoulders are to touch the floor. make sure your body is not shaking or moving to and fro. Keep the legs straight. Concentrate on your thyroid gland found in the front lower part of your neck.
If you feel calf muscles tighten or starting to cramp – bend your knees a bit to ease off the tension. Having done that for a few seconds come back to the straight leg position again.
If you are an intermediate or advanced student try and straighten your back as much as possible. Time again bring your elbows and hands closer to each other.
How do you come out of this position?
- First, to come out of the basic Yoga Asana – lower your feet to a 45-degree angle over your head.
- Then, bring your hands to the floor, palms facing down. Concentrate on keeping your head on the ground.
- Without lifting your head, slowly roll out of the position vertebra by vertebra.
- Breathe normally until you touch your pelvis to the floor and then exhale using your abdominal muscles to lower your legs slowly to the floor. While doing so your knees should be straight.
- After the body is completely on the floor relax and rest in the Corpse Pose (Savasana) for a minimum of 60 seconds. Don’t get up with a jerk instantly after finishing it.
How long do you hold the Pose?
You can hold this pose for a count of 4 or for three breaths or longer as per your comfort. When you are Holding the Pose – keep breathing deeply in and out.
To Know Benefits of Shoulder Stand – Click Here
Follow the Single and Double Leg Raises by Relaxation (Savasana or Corpse Pose) – To Know more
Fourth,
Basic Yoga Pose: Matsyasana or Fish Pose
The basic Yoga Asana – Matsyasana or Fish Pose (Asana) should be practised right after performing the Sarvangasana or Shoulder Stand. It relieves congestion and cramps which can be caused by the Shoulder stand.
HOW TO DO THE FISH POSE (MATSYASANA)?
Let’s begin the basic Yoga Asana – Matsyasana or Fish Pose:

Step 1
Lie flat on your back and bring your legs and feet together. Keep the knees straight and place both the arms under your body. Your hands should be as far under your thighs as possible. make sure your palms are facing down. Keep your elbows as much as possible under your back. The position aims to bring your shoulders further back.
Step 2
Bend the elbows and push them on the floor below. Keep your weight on your elbow and use them to lift your chest off the floor so that you are sitting up halfway. Drop your head slowly backwards so that the top of the head is touching the floor, however, the weight is distributed on the elbow.
Make sure, your mouth is closed while doing this exercise – to enable the neck and chest to get a nice stretch. If you are a beginner stay in this position and hold it for at least 15 seconds, half the time recommended for the shoulder stand.
Step 3
Keep your face, legs and feet without any tension – completely relaxed. To balance yourself try and distribute your body weight on your buttocks and elbows. The idea is to arch the chest as high as you can. Since the chest is open wide make use of the pose by inhaling deeply. Take natural breaths. Over a period of time comfortable to you hold your breath for 1 1/2 minutes approximately (if you can).
How to come out of this position?
- To come out of the Basic Yoga Pose – Matsyasana or Fish Pose lift your head gradually while you lower your back to the floor.
- Once you are lying down relax in a Corpse Pose.
- Roll your head either side slowly so that you make the muscles loose and then bring it back to the centre.
Neck Stretch after the Pose
There could be tension in your neck area after doing the Fish Pose, therefore to release it follow these steps:
Step 1:
Hold your head by interlocking your fingers behind your head while you are lying on the floor face up. Bring your elbows pointed towards the sky or ceiling and fore-arms next to your ears.
Step 2:
Inhale and lift your head with the help of the fingers behind your head and push your chin into top of your chest. Hold this pose for a count of 4.
Step 3:
While you exhale lower your head back onto the floor or mat. repeat these steps twice. Relax into a corpse pose for 1-2 minutes.
How long do you hold the Pose?
As you stay and hold this Pose – do it for a count of 4 or for 2-3 breaths as per your comfort. When you are Holding the Pose – keep breathing deeply in and out.
To Know Benefits of Fish Pose – Click Here
Fifth,
Basic Yoga Pose: Forward Bend (Paschimottanasana)
The seated forward bend in Basic yoga Poses looks much more simple than it actually is. The pose is both demanding and extremely important at the same time.
The main benefit of Seated forward bend is to improve the elasticity of your spine, mobility in joints, internal organs toned and nervous system invigorated. With so many benefits under one Yoga pose – what else can you ask for!
How to do Seated Forward Bend (Pashcimottanasana)
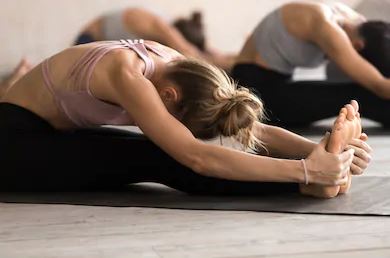
Step 1:
Sit up on the Yoga Mat while your legs are together and stretched out straight in front of you. Point your toes backward towards you. Try and sit directly on your pelvic bone by pulling out the flesh underneath your buttocks if any.
Step 2:
As you inhale stretch both your arms over the head so that you raise them parallel to the ears. Make a gentle effort to straighten and stretch your spine as much as you can comfortably.
Step 3:
As you retain the stretch pull your abdomen in and exhale and fold your body forwards from the pelvis. Lead this movement from your chest while keeping your back straight.
Step 4:
Bend forward until your hands reach your shins, ankles or feet – also stretch your head and spine forwards as much as you can. Let your elbows hang loose so that the tension in your shoulders and neck is released.
If you are not able to hold your toes – do not worry.
Hold your shins, ankles or knees as per your convenience. You will improve on flexibility with time.
Breathe deeply and slowly while making sure your head, neck and back are all in the same line. As you exhale feel you are stretching forward a little more each time.
Check if you have tightened your body at any place. Imagine that you are sending fresh breath in that area and help that part to relax. Visualize that the top of your head is coming down towards your feet.
Step 5:
When you are in the seated forward bend Pose – make an effort to bring your abdomen as close to your thighs as possible. Keep your knees and thighs straight to give them a nice stretch. Do not allow your feet or legs to go outwards – to do this point your toes towards you.
Step 6:
For Seated Forward Bend beginners – stay in this position for 10-30 seconds while breathing deeply. Repeat coming forward with each exhalation 2-3 times.
Step 7:
For Intermediate/Advanced students – you can stay in this position for longer. By gradually increasing this position over time hold it for 5 minutes. Remember, yoga is all about breathing – therefore breathe deeply while holding the position.
Tips: Don’t fold the body – keep back straight while the thigh and muscles are relaxed.
Advanced students: You could rest the abdomen on the thighs, chest on the knees and head between the shins.
HOW TO COME OUT OF SEATED FORWARD BEND IN YOGA?
Step 1:
Inhale and stretch the body forward and upwards. Do this until your arms and fingers are pointing upwards towards the roof or sky.
Step 2:
Relax the arms and come into the counterpose (Inclined plane).
How long do you hold the Pose?
Hold this Pose for a count of 4 or for 2-3 breaths or longer as per your comfort. When you are Holding the Pose – keep breathing deeply in and out.
For Benefits of seated Forward bend Pose – Click here
Sixth,
Basic Yoga Pose – Purvottanasana or Inclined Plane
For optimal flexibility in all muscles you need for both strength and length. After you have stretched your muscles in the back by forwarding stretches it is a must for you to contract the same muscles to make them stronger.
This basic Yoga Pose is also a counterpose to the Forward Bend Pose. It improves your sense of balance, makes your arms, legs and back stronger.
How to do the Purvottanasana or Inclined Plane Pose?
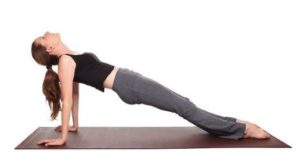
Step 1:
When you sit on the Yoga mat with your legs stretched out straight, place your hands flat on the floor 1 feet behind you with your fingers pointing backwards. Lean a little bit backwards on your hands. Now take a few deep breaths and then Inhale.
Step 2:
Next, drop your head back and try and bring your should blades together. Make sure your mouth is closed.
Step 3:
Then, Exhale and lift your hips upwards as much as possible. (See Image above). Also, try and bring your feet flat on the Yoga mat, with your feet together. Remember, that your feet should not turn outwards. Moreover, keep your knees straight. If you are a beginner you may hold this pose only for a maximum of 10 seconds. As you advance aim to stay in this basic Yoga Asana for 1 minute. When you are Holding the Pose – keep breathing deeply in and out. Hold this Pose for a count of 4 or for 2-3 breaths or longer as per your comfort.
Step 4:
To come out of the Pose come back to sitting on the Yoga mat and shake your wrists – as your body pressure was on them during the Asana. Also, stretch your arms straight out in front of you and roll down to lie down on your back.
How long do you hold the Pose?
Try to hold this Pose for a count of 4 or for 2-3 breaths as per your comfort. When you are Holding the Pose – keep breathing deeply in and out.
Relax on your abdomen
Lying on your abdomen – BASIC YOGA POSES
Seventh,
Basic Yoga Pose: Bhujangasana or Cobra Pose
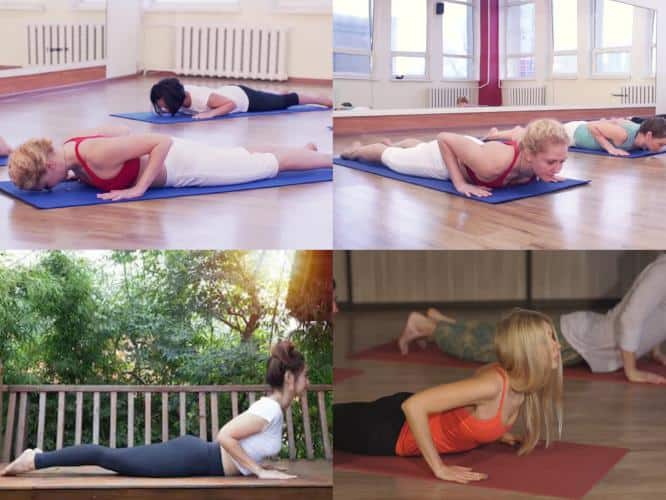
Step 1:
With your legs together, toes touching and heels apart as you lay down on your abdomen on the floor bring your hands to the side of your shoulder with palms flat on the yoga mat. Your hands should be next to each respective shoulder and fingertips in line with the shoulder top. While you take your hands down also bring your forehead to the ground. keep your elbows bent, inwards towards the body and pointing slightly upwards. Do not lift your shoulders – keep them away from the ears.
Step 2:
As you inhale visualize the smooth movement of the snake. While doing so inhale and roll the head up looking ahead and then stretch your neck so that you bend your head backwards. While doing so – first your nose will lift and then your chin.
Step 3:
Push your hands on the floor as you raise your chest off the floor at the same time as the head.
Step 4:
Feel each vertebra by vertebrae stretching of your body as you arch the upper portion of your body. As you do this remember each vertebra helps the pressure travel downwards from the cervical, dorsal and lumbar areas. Therefore it reaches the sacrum lastly. Your hips and legs should be placed on the ground.
Step 5:
As you look up to draw your shoulder blades close to each other while feet are also kept together.
Step 6:
Once you come into the position hold it for a count of 4 using the strength of your upper back and neck rather than the arms. If you are a beginner – hold the position for 10 seconds. However, more advanced students can gradually increase the time span to hold yourself in this position for a minute. While you are in the position – remember to breathe in and out comfortably. Breathe in through your nostrils and make sure to keep your mouth closed.
HOW TO COME OUT OF THE BHUJANGASANA IN HATHA YOGA
Step 1:
As you take a deep breath after breathing normally for 10 seconds or 60 seconds – exhale and roll out slowly out of the posture. Firstly, uncurl your back while you keep your head arched backwards. When the entire back is rolled out then end up rolling down your forehead on the floor.
Step 2:
If you are a beginner do Bhujangasana just ‘once’. However advanced students can repeat this 2-3 times before you relax on your abdomen. Place your hands folded under your head and rest your cheek on your hands with your head turned on one side.
How long do you hold the Pose?
When you lift your torso hold this Pose for a count of 4 or for 2-3 breaths as per your comfort. When you are Holding the Pose – keep breathing deeply in and out.
Benefits of Bhujangasana or Cobra Pose – To Know More
Standing Basic Yoga Poses
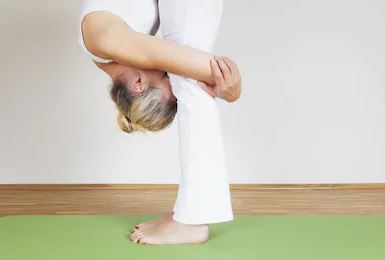
Eleventh,
Basic Yoga Pose: Pada Hastasana or Standing Forward Bend Pose
In case you sit on a chair for long hours and you can’t change your posture due to work commitments – try the Standing Forward Bend Pose or Padahastasana. It is the best solution for stiff legs by using the pull of gravity. Because this asana lengthens the ligaments and muscles of the posterior (back) side of your body. It helps you right from your heels to the middle of the back.
This Yoga Pose/asana is like a preparation for the next pose called the – Trikonasana or Triangle Pose in Yoga.
HOW TO DO THE Hastasana or STANDING FORWARD BEND POSE?

Step 1:
Stand straight with your feet together.
Step 2:
As you inhale raise your arms over your head, while the arms are straight and next to your ears. Arms should be pointing upwards towards the roof or sky.
Step 3:
Exhale while you bend forward from the hips so that you make a 90-degree angle with your upper body and arms.
Step 4:
Continue to breathe out as you bend further down bringing your forehead and nose as close to your knees as possible. Take care of your knees as they should be straight.
Step 5:
Hold your big toes in the ‘Classical Foothold’ or just in case you cannot stretch so far – hold your ankle or your calves to your knees.
(Classical Foothold: “Wrap the index finger around the big toe and place the thumb underneath. Curl the remaining three fingers against the inner palm.”)
While doing so – your shoulders should be relaxed. As you take each breath while holding yourself in this position stretch yourself further with each breath.
If you are a beginner- hold this position for only 5 seconds.
How to come out of the Standing Forward Bent Pose?
As you inhale raise yourself up slowly until you are in a standing pose.
Hand Variation of Pada-Hastasana:
When you are able to hold the Standing Forward bend or Padahastasana position for a few minutes comfortably as you gain flexibility you can try the variations. The variations are designed to give the stretch in a different manner altogether.
First Variation:
Reach behind your legs and catch the opposite elbows with the opposite hands.
Second variation:
Lift the front feet off the floor and slide your hands under them pointing inside and then lower your feet.

Precautions while Practicing Standing Forward Bend Pose:
Keep your knees straight – making sure they are neither be bent forward not arched backwards. The idea is to keep the knees straight.
How long do you hold the Pose?
While you are bent forward hold this Pose for a count of 4 or for 2-3 breaths as per your comfort. When you are Holding the Pose – keep breathing deeply in and out.
Benefits of Standing Forward Bend Pose – To Know More
Twelfth,
Basic Yoga Pose: Trikonasana or Triangle Pose
Trikonasana or Triangle Pose gives very good lateral movement to the spine. Moreover, it also stretches the muscles amd strengthens the side of the body. It helps in improving the balance of the body. It is last of the 12 basic asanas in the cycle.
Most importantly, it enhances the Half Spinal Twist.
How to do the Trikonasana or Triangle Pose?

Step 1:
Stand upright and then stretch your legs apart – twice the width of your shoulders. Turn your left foot towards the left side so that it aligns with the instep of your right foot. Make sure your spine, head and chest are straight so that your body is facing forwards.
Step 2:
As you Inhale – bring raise your right arm so that it is pointing the roof or sky and is parallel to your right ear. The raised arm should be straight. Feel the side of your body stretch as if the arm is being pulled from the waist.
Step 3:
Keep the left hand resting on the outside of the left thigh.
Step 4:
As you retain the stretch, start exhaling and bending sideways to the left side. The left-arm should slide down your thigh towards the left leg. The body should not be twisted. Moreover, the arms and knees are to be kept straight. The lower arm should not bear any weight. The right arm should be next to your right ear without turning your head towards it.
Step 5:
Try and hold yourself in this position for 30 seconds and breathe in and out deeply while you do so. If you can comfortably – build this up to 2 minutes.
How to come out of the Pose:
Step 1:
Inhale and return to the standing position
Step 2:
Repeat the pose 2-3 times on both right and left sides.
How long do you hold the Pose?
When nedning sideways hold this Pose for a count of 4 or for 2-3 breaths as per your comfort. When you are Holding the Pose – keep breathing deeply in and out.
For Benefits of Trikonasana or Triangle Pose – To Know More
For details on the other Yoga Asanas (Poses) Click on our website Yoga Section on the Home Screen. Do let us know if you have any queries on the Basic Yoga Poses (Asanas).
Related Articles:
6 Easy Yoga Poses for Digestion and Bloating
How to do Mindfulness Meditation – Steps and Technique
Sitting in front of the computer all day? Here are Yoga Poses to cure Neck and Shoulder Pain
How is Gratitude Life Changing – The Science Behind